物理シミュレーションはROSなしでは苦しいと思ってましたが……あるとこにはあるんですねぇ。
実際のところ
今回目的としているxArmのURDFモデルはライブラリにデフォでついてきます。
GitHub - bulletphysics/bullet3: Bullet Physics SDK: real-time collision detection and multi-physics simulation for VR, games, visual effects, robotics, machine learning etc.
Google Colaboratryで
%%time
!pip install pybullet
import pybullet as p
import pybullet_data as pd
import numpy as np
import matplotlib.pyplot as plt
from matplotlib import pylab
%matplotlib inline
p.connect(p.DIRECT)
#allow to find the assets (URDF, obj, textures etc)
p.setAdditionalSearchPath(pd.getDataPath())
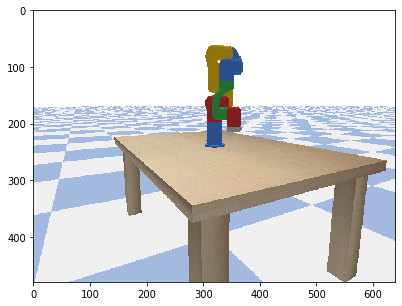
p.resetSimulation()
p.configureDebugVisualizer(p.COV_ENABLE_GUI)
useFixedBase = True
flags = p.URDF_INITIALIZE_SAT_FEATURES

plane_pos = [0,0,-0.625]
plane = p.loadURDF("plane.urdf", plane_pos, flags = flags, useFixedBase=useFixedBase)
table_pos = [0,0,-0.625]
table = p.loadURDF("table/table.urdf", table_pos, flags = flags, useFixedBase=useFixedBase)
xarm = p.loadURDF("xarm/xarm6_robot.urdf", flags = flags, useFixedBase=useFixedBase)
%%time
camTargetPos = [0, 0, 0]
cameraUp = [0, 0, 1]
cameraPos = [1, 1, 1]
p.setGravity(0, 0, -9.8)

from google.colab import widgets
import numpy as np
import random
import time
from matplotlib import pylab
grid = widgets.Grid(2, 2)
yaw = 0
r = 0
c = 0
yaw = 60
with grid.output_to(r, c):
  grid.clear_cell()
  pylab.figure(figsize=(10, 5))
  pitch = -10.0
  roll = 0
  upAxisIndex = 2
  camDistance = 1.5
  pixelWidth = 640
  pixelHeight = 480
  nearPlane = 0.01
  farPlane = 100
  fov = 60
  viewMatrix = p.computeViewMatrixFromYawPitchRoll(camTargetPos, camDistance, yaw, pitch,
                                                              roll, upAxisIndex)
  aspect = pixelWidth / pixelHeight
  projectionMatrix = p.computeProjectionMatrixFOV(fov, aspect, nearPlane, farPlane)

  img_arr = p.getCameraImage(pixelWidth,pixelHeight,viewMatrix,projectionMatrix)
  w = img_arr[0]  #width of the image, in pixels
  h = img_arr[1]  #height of the image, in pixels
  rgb = img_arr[2]  #color data RGB
  dep = img_arr[3]  #depth data
  print("w=",w,"h=",h)
  np_img_arr = np.reshape(rgb, (h, w, 4))
  np_img_arr = np_img_arr * (1. / 255.)
  pylab.imshow(np_img_arr, interpolation='none', animated=True, label="pybullet")
レンダリングすると、こんな塩梅で画像が表示されます。
公式のデモではデプスカメラの解析だの犬ロボットの